
By Nathan Dowdell, 2d20 System Developer
Art by Justin Usher
This post takes a scene from the Star Trek franchise and uses it as an example for explaining the rules of Star Trek Adventures. If you’ve got a particular scene you’d like to see written up in this format, please let us know on our official Discord!
This example is the first encounter between the Federation and the Jem’Hadar in the Deep Space Nine episode “The Jem’Hadar.”
Participants
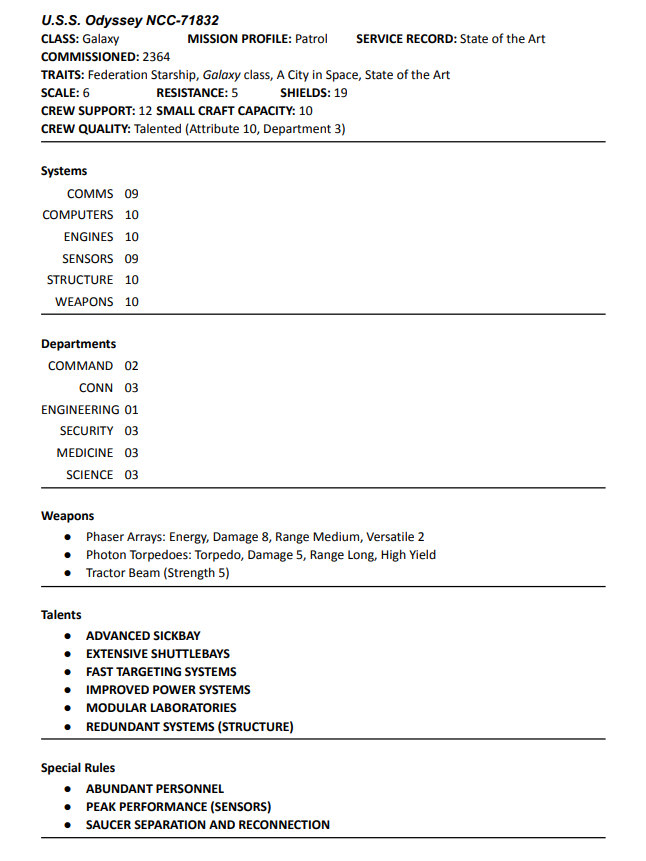
This climactic season finale ends with a shocking encounter between Starfleet’s Galaxy-class U.S.S. Odyssey with several runabouts against a trio of Jem’Hadar attack ships.
The runabouts are crewed by Major Kira Nerys, Odo, Lt. Jadzia Dax, Chief Miles O’Brien, and Doctor Julian Bashir. The statistics for these characters can be found in the DS9 Crew Pack, though with a few adjustments to bring it into second edition; Dr. Bashir is not using any of his Augment abilities, as that secret hasn’t yet been revealed. The U.S.S. Odyssey’s stats are listed below, presented as a full player character starship, but with an NPC crew rating, so you could use it as either a PC or NPC vessel in your own games. The Danube-class runabouts U.S.S. Rio Grande, U.S.S. Mekong, and U.S.S. Orinoco use the runabout stats on page 234 of the Star Trek Adventures second edition core rulebook. The Mekong and the Orinoco are fitted with the Combat Mission module, while the Rio Grande is equipped with a Long Duration Mission module.
The statistics for the Jem’Hadar Attack Ships can be found on page 367 of the core rulebook. As NPC ships, the Jem’Hadar Attack Ships don’t track Reserve Power and cannot Reroute Power, but they are assumed to have Reserve Power whenever they take actions that require it.
Runabouts, Break Formation, Attack Pattern Delta
The Odyssey, accompanying the Mekong and Orinoco, has entered the Gamma Quadrant, seeking to rescue Commander Sisko, Jake, Nog, and Quark, who have been captured by the Dominion. The threat posed by the Dominion is an unknown one: the Federation has not yet encountered the Dominion’s forces, and the potential danger is why the Odyssey has been pulled from patrol duties to lead the rescue.
The Odyssey, Mekong, and Orinoco drop out of warp to meet the Rio Grande, currently occupied by Jake and Nog. The Rio Grande has an additional trait, Computers Offline, due to Jake and Nog inexpertly trying to bypass the automatic pilot. It can only operate on manual, and the runabout cannot assist with any task. Chief O’Brien has beamed aboard the Rio Grande to help Jake and Nog.
Dax and Odo are aboard the Mekong, Kira and Bashir operate the Orinoco. O’Brien takes the Rio Grande to try to rescue Commander Sisko and Quark from the planet’s surface.
The Odyssey detects three incoming ships, the Jem’Hadar Attack Craft, which will be in range at any moment. Captain Keogh, commanding the Odyssey, gives the order for the runabouts to break formation and begin an attack pattern.
The Federation side of this conflict has 10 turns each round: Dax, Odo, Kira, Bashir, and six turns for the Scale 6 Odyssey. The Dominion side has 9 turns each round: three from each attack ship.
The player characters have a little Momentum saved up from Commander Sisko and Quark’s escape attempt (the previous scene), but this is the episode’s climax, so the gamemaster has a fair amount of Threat saved. The player characters take the first turn.
However, the Federation has never faced the Jem’Hadar in battle, and they are unprepared for the Dominion’s weapons capabilities. The gamemaster spends 4 Threat for a Reveal, adding the trait No Defenses. This applies to all Federation vessels in this scene, and any attack the Jem’Hadar ships make with Phased Polaron Beams will ignore the target’s Shields, inflicting damage as if the target had Shields 0.
Round 1:
Momentum: 1 Threat: 8
Player characters turn 1, “Here they Come.” Kira pilots the Orinoco forward, taking the Impulse minor action to move into position, and the Attack Pattern action to aid any attacks Bashir makes from Tactical.
Momentum: 1 Threat: 8
Gamemaster turn 1. Attack Ship 1 also moves forward at Impulse, and takes the Attack Pattern action. Then, they Keep the Initiative by spending 2 Threat.
Momentum: 1 Threat: 6
Gamemaster turn 2. Attack Ship 1 attacks the Odyssey with Phased Polaron Beam Banks. The attack is Difficulty 2, but the attack gets 4 successes, so 2 Momentum for the Dominion side. They inflict 6 damage, and the gamemaster spends that 2 Momentum on the Devastating Attack spend, hitting a second location for 3. As these are Piercing weapons, they’re ignoring Resistance, so this inflicts two breaches on the Odyssey instantly: Forward Torpedo Launcher Offline (Weapons) and Port Nacelle Plasma Leak (Engines).
Momentum: 1 Threat: 6
Player characters turn 2. The Odyssey fires back at the incoming Jem’Hadar ships. The ship’s Tactical Officer performs the Targeting Solution minor action, allowing a re-roll of one die on the attack and, because of the ship’s Fast Targeting, picking the location hit. Then the Odyssey attacks: This is a Difficulty 2 attack against Attack Ship 1, and he scores 4 successes (after the re-roll), generating 2 Momentum. He chooses Spread for the attack, as the Dominion ships are too far apart for him to benefit from Area. Damage 8 against Attack Ship 1 inflicts 6 damage, and Odyssey spends its 2 free Momentum (Phasers are Versatile 2) to hit twice more for 4 damage each using Spread: in all, inflicting 10 damage, and causing the Attack Ship to be Shaken, losing their next major action. The Odyssey spends 2 Momentum to Keep the Initiative.
Momentum: 1 Threat: 6
Player characters turn 3. The Odyssey attempts to find a shield frequency that the Dominion can’t cut through like butter. The gamemaster rules that this is a task to try and change or remove the No Defenses trait; this would normally be Difficulty 2, but the gamemaster rules that the unfamiliarity with Dominion weapon systems means that the trait itself makes that attempt more difficult, and then spends 2 further Threat to add a complication: Complex Task Under Fire, denoting that this action is made all the more difficult by occurring while the Odyssey is taking heavy damage. Difficulty 4 in all. The Odyssey crew spends 1 Momentum to buy a die to try and offset the Difficulty… but they only get 3 successes. They’ve tried every frequency to try and block the Jem’Hadar attacks, but to no avail.
Momentum: 0 Threat: 6
Gamemaster turn 3. Attack Ship 2 moves forwards at Impulse, and takes the Attack Pattern action. Then, they Keep the Initiative by spending 2 Threat.
Momentum: 0 Threat: 4
Gamemaster turn 4. Attack Ship 2 attacks the Odyssey with Phased Polaron Beam Banks. The attack is Difficulty 2, but the attack gets 5 successes, so 3 Momentum for the Dominion side. They inflict 6 damage. Again, these are Piercing weapons; they’re ignoring Resistance, so this inflicts another breach on the Odyssey instantly. The ship now has the breach Crew Casualties (Structure), but this is immediately cancelled out by the Odyssey’s Redundant Systems (Structure) talent. Three points of NPC Momentum are turned into Threat.
Momentum: 0 Threat: 7
Player characters turn 4. The Orinoco attacks, with Bashir taking the Calibrate Weapons minor action, then firing the phasers at Attack Ship 3 to try and draw it away from the Odyssey. Difficulty 2, but Bashir rolls 2 successes, the runabout rolls 1, and Kira’s assist from Attack Pattern rolls a critical success, so a total of 5 successes. Three Momentum scored, plus an extra 1 from Kira’s Pack Tactics talent, and +2 for the Phasers being Versatile 2. The Phasers deal 6 damage to the Attack Ship, increased to 7 by spending 2 Momentum, inflicting 5 damage to the Attack Ship’s shields, and spending 2 more Momentum to create a trait: Drawing Fire. Then, they use the last 2 Momentum to Keep the Initiative.
Momentum: 0 Threat: 7
Player characters turn 5. The Mekong, piloted by Dax, moves at Impulse, and takes Evasive Action.
Momentum: 0 Threat: 7
Gamemaster turn 5. The third Attack Ship moves at Impulse, and takes the Attack Pattern action, looking like it’s going to ignore the Drawing Fire trait. It spends 2 Threat to Keep the Initiative.
Momentum: 0 Threat: 5
Gamemaster turn 6. The third Attack Ship opens fire on the Odyssey with Phased Polaron Beam Banks. The attack is Difficulty 2, but increases to 3 because of the Drawing Fire trait—as the Mekong is trying to distract them—but the attack gets 3 successes, so they hit and inflict 6 damage. Once again, these are Piercing weapons; they’re ignoring Resistance, so this inflicts another breach on the Odyssey instantly: Warp Nacelle Offline (Engine).
Momentum: 0 Threat: 5
Player characters turn 6. Odo, operating the Mekong’s weapons, opens fire on Attack Ship 2. He takes the Targeting Solution action for a re-roll, then makes the attack. This will be Difficulty 2, increased to 3 because Dax took Evasive Action. He scores 3 successes, and the attack succeeds, inflicting 5 damage, which is reduced to 3 by the Attack Ship’s Resistance.
Momentum: 0 Threat: 5
Gamemaster turn 7. Attack Ship 1 attempts to Regenerate Shields. It scores 2 successes and restores shields, bringing it back up to 6 shields.
Momentum: 0 Threat: 5
Player characters turn 7. The Odyssey attempts to move and draw the Dominion ships away from the planet while also making itself a harder target for the persistent Jem’Hadar attacks. It moves at Impulse, then takes Evasive Action.
Momentum: 0 Threat: 5
Gamemaster turn 8. Attack Ship 2 continues to move, flying at Impulse and taking the Maneuver action, scoring 3 successes, which become 3 Momentum. Not needing to spend any Momentum right now, it’s all added to Threat.
Momentum: 0 Threat: 8
Player characters turn 8. The Odyssey attempts damage control, attempting to deal with the Port Nacelle Plasma Leak breach; this is Difficulty 2. However, they only score one success: still under fire, they can’t quite manage to make repairs.
Momentum: 0 Threat: 8
Gamemaster turn 9. The third Attack Ship also continues flying, moving at Impulse and taking the Maneuver action, scoring 2 successes, which become 2 Momentum. Not needing to spend any Momentum right now, it’s all added to Threat.
Momentum: 0 Threat: 10
Player characters turns 9 and 10. With no other enemy ships to act, Odyssey finishes up the round. First, Captain Keogh talks to the runabouts and takes the Rally action. However, a little disappointingly, Odyssey only scores 1 success, generating 1 Momentum. Then, at Keogh’s command, Odyssey redirects power to Weapons.
Momentum: 1 Threat: 10
Between rounds, the gamemaster takes the action back to Sisko and Quark escaping the Jem’Hadar, and being rescued by O’Brien aboard the Rio Grande.
Round 2:
The start of the second round: the Jem’Hadar receive the first turn because the Odyssey took the last turn of the previous round.
Gamemaster turn 1. Attack Ship 2 begins the round by calibrating weapons and attacking the Odyssey. Difficulty 2, but the Attack Ship gets 2 successes, inflicting 7 damage to the Odyssey, and inflicting an additional breach: Phaser Controls Offline (Weapons). The Odyssey is on 5 breaches now.
Momentum: 1 Threat: 8
Gamemaster turn 2. Attack Ship 2 moves at Impulse and uses the Maneuver action. It scores 3 successes, spending 2 Momentum to use its Improved Impulse Drive talent, and saving the other one as Threat.
Momentum: 1 Threat: 9
Player characters turn 1. The Orinoco attacks Attack Ship 2, with Bashir taking the Calibrate Weapons minor action, then firing the phasers. Difficulty 3, with the Attack Ship’s Improved Impulse Drive. They only get 2 successes, and the attack fails, phaser beams glancing ineffectually off the Attack Ship’s shields. Desperate to keep pressure on the Dominion, they add 2 to Threat to Keep the Initiative.
Momentum: 1 Threat: 9
Player characters turn 2. The Mekong follows Orinoco’s lead, with Odo taking the Targeting Solution action and firing phasers. Difficulty 3 still. Three successes rolled, plus 2 free Momentum from the Phasers Versatile 2, so the attack hits, inflicting 4 damage, increased to 5 with Momentum. 3 damage overall to the Attack Ship.
Momentum: 1 Threat: 11
Gamemaster turn 3. Attack Ship 2 turns back to attack the Mekong. It Calibrates Weapons first, then spends 1 Threat to attempt a second Weapons task this turn. It scores 4 successes, against a Difficulty of 2, and spends 2 Momentum for a Devastating Attack. These two hits inflict two breaches, one each to Computers and Sensors. A third breach will destroy the runabout.
Momentum: 1 Threat: 9
Gamemaster turn 4. Attack Ship 1 moves at Impulse and takes Evasive Action, then Keeps the Initiative.
Momentum: 1 Threat: 9
Gamemaster turn 5. Attack Ship 1 takes the Targeting Solution action and then attacks Odyssey, which is a Difficulty 3 task due to Evasive Action. It scores three successes. The attack hits and inflicts a breach: Short-Range Comms Offline (Communications). The Odyssey is on 6 breaches.
Momentum: 1 Threat: 9
At this point, the player characters decide to withdraw.
Player characters turn 3. The Orinoco moves at Impulse away from the battle, taking the Maneuver action. They score 3 successes. It spends 2 to Keep the Initiative and saves the other one.
Momentum: 2 Threat: 9
Player characters turn 4. The Odyssey attempts to Regain Power so that it can go to warp. This is Difficulty 1, and the Odyssey scores 2 successes, but rolls a complication too. The gamemaster rules that the Odyssey can’t Keep the Initiative—there’s an opening for the Jem’Hadar to exploit.
Momentum: 3 Threat: 9
Gamemaster turn 6. Attack Ship 3 approaches on Impulse, and attempts to Ram the Odyssey. This is an opposed task, as the Odyssey is still under Evasive Action from last turn. The Odyssey spends 3 Momentum for +2d20, and scores 6 successes overall… but the gamemaster rules that the two Engine breaches and the Structure breach hinder Odyssey’s attempts to maneuver out of the way. The Jem’Hadar purchases +2d20 dice as well, scoring 4 successes: enough to win and score 1 Momentum. The Attack Ship inflicts 4 damage; the gamemaster spends 6 Threat to bring this up to 10, and the other two on Devastating Attack, causing a second hit for 5. The main hit strikes the ship’s Structure, while the other hits the Engines, causing enough damage to reduce the Odyssey to below 25% all in one attack, causing a seventh breach, which is also enough to destroy the Engines system. The Odyssey, stricken and suffering catastrophic damage, explodes as its warp core is breached. The Jem’Hadar ship is destroyed in the collision and the following explosion.
The scene ends as the remaining Jem’Hadar withdraw and allow the runabouts to flee.
After-Action Report
This scene takes very little time to play out on screen, but is more complex to resolve in play: among other things, there are several ships on each side, and a lot happens in a very short space of time, with the fight taking place over about two minutes in total.
It’s also an unusual scene in that there’s an underlying premise that pitches the entire fight firmly in favor of the Jem’Hadar, which is outside what’s normally the case for the game’s rules. The assumption is that the Federation and its allies find methods to mitigate the Jem’Hadar weapons after this, but this is a moment where the Federation’s ships are especially vulnerable.
What are your thoughts on this example of play? How would you and your crew handle this differently? What other key scenes from the Star Trek franchise would you like to see written up? Share your ideas and insights with your fellow fans at the official Modiphius Discord!
2nd Edition Core Rulebook (Command):
2nd Edition Core Rulebook (Sciences):
2nd Edition Core Rulebook (Operations):
All physical orders will also receive the digital versions right away.
Alternatively, you can order the digital editions by themselves of the standard core rulebook and the Game Toolkit.
2nd Edition Core Rulebook PDF:
Thanks for reading this article, and thank you for your interest and support of Star Trek Adventures! Keep frequencies open for news about other upcoming Star Trek Adventures product releases. Live long and prosper!
TM & © 2025 CBS Studios Inc. © 2025 Paramount Pictures Corp. STAR TREK and related marks and logos are trademarks of CBS Studios Inc. All Rights Reserved.
![]()
Read more at this site